Showing posts with label Second Life. Show all posts

Sunday, 19 July 2015

Beyond the Veil: Demonic Invasion

Well I just finished update 1.3 of the Beyond the Veil HUD system for Second Life and everything seems to be going really smooth. With thirty seven demons already roaming the lands and twenty one Angels holding them back, the battle is on the verge of an all out war. The demons are taking over so if you know anyone that wants to be an Angel get them on board.

I want to first start by saying Thank You to all the players of Beyond the Veil. This game is my passion and to see people playing the game, competing with one another and being excited about updates really gets me fired up too. I have a lot of ideas for this game and I really want to see it become one of the biggest games in Second Life.

I want to start with a quick chat about an issue with Bloodlines players. These people are getting upset that a Beyond the Veil players have stolen a soul. This is a misunderstanding about the term soul within Second Life.

A Beyond the Veil demon was in a club cursing people and taking souls. Someone in the club had a device that allowed them to see all hidden chat and saw that a soul from a person they know was stolen. They thought that it would effect the bloodlines stats.

Avatars in Second Life do not have a soul. Linden Labs never gave them one. Bloodlines emulates this with a piece of information in a database. Beyond the Veil does the same thing however both "souls" are not the same. A soul can be owned in Bloodlines and owned by someone else in Beyond the Veil. They do not effect each other.

Now to prevent this confusion from happening again, when the HUD tells you you have taken a soul, it now does this in an IM to you. I was using llOwnerSay displays the message in local chat but only to the owner. My guess is his device could read Owner Say. I am not 100% sure if people can access private messages but I would think that would be a violation in privacy so wouldn't be possible.

Another frequently asked question from non players to me is the collection of information about non playing avatars and how that information is being used. I thought I would address that here.

The only information I collect about an avatar is the name. In the database I would have something like Name: Sigh Parx, Soul Condition: Blessed, SoulLocation: Raiden Faxel. If a player was to join the game then their avatar key would be stored also for in game reasons. Any and all information kept is solely for Beyond the Veil's use and will never be used for any other reason. The only time a non player will hear from us, is when a player speaks to them about the game and asks them to join. Non player's information will not even be shown anywhere except when they are scanned by an avatar and they must be within range. The information will not be visible on our website or any other location.

Okay, with that out the way lets have a quick look into what is coming. The next step for me is to build a Website to get all the stats for all to see. It will take some time to design and build so you have to be patient with me. I have a designer to do the design work. Some of you may know her as Bella Parx.

After the website comes the big update, the battle system. A lot of people have been asking me how this will work. Well to be honest, I don't know yet. We have started designing it and I'll give you an insight to the thought pattern.

First of all I do not want the battle system to be just target click dead. Although that would work I think you guys deserve a little more than that. I want to have more than just 1 button to click.
I am hoping to have multiple skill trees. These may be something like Range, Melee and Protection. You wont have to select a class and will be able to select skills from either skill tree. I want to add an experience bar which will give you skill points. These skill points will be spent on skills.

Range: Battle from a distance safe from harm of Melee attackers.
Melee: Up close and personal.
Protection: These spells will be things like heals, shields and things that can protect other players.

Now all of this is just theory. It's what I want but it's not a promise. Things may change. Also, when the battle system comes out, if it is done like this, only one of the skill trees will come out, then in a later update another skill tree and so on.

The next thought, and this as well is not a promise, just a thought; is animations. I want these battles to look awesome. Now my biggest fear with this is lag. If we get too many people doing these amazing effect it could cause bad lag. We will see what I can do.

The last thought, and my most favourite, a battle sim. I want a FULL sim where all Angels and Demons can come and kick arse. But it won't just be a place to kill angels or demons. No no. I want to add another objective to do on the SIM. This WILL be kept a secret though so until then, thats all the info you will be getting.

Okay so that's it guys. that's the plan and the idea with absolutely no promises.... except to the non players. I promise I will not use your information for any reason other than the Beyond the Veil game.

Thursday, 25 June 2015

Beyond The Veil: Overview

Overview

Beyond the Veil is a HUD based MMORPG in Second Life. It was release on 24th June 2015. It is a battle between Angels and Demons to control the souls of humanity. To be immortal a demon or an angel must drink from a Spring of Youth. These springs are connected to the Fountain of Youth.

Each day your immortality fades. You have thirty points of immortality. Each day you lose one. If your immortality reaches zero you will no longer be immortal and in turn no longer be able to hold the souls you have collected. All the souls you have collected will be released back to their bodies.

You can play Beyond the Veil alone or in a group. Being alone will be harder to level and harder to defend yourself against the opposite race. So it is better to find a group to join. To grow your group you can ascend avatars to join the battle for your side. Once they are ascended, offer to be their Guardian Angel or Liege. If they accept, it is your responsibility to help them and teach them how to grow. After all their soul count is included in yours.

Each Host and Legion has a Soul Crystal. These crystals hold all the souls your group has collected. If a member of the opposite race manages to touch your Soul Crystal they will steal a soul from that group. The more they touch, the more souls the can steal. An unguarded Soul Crystal is the fastest way to gain Souls.

In a soon to be released patch, a battle system will be included in the HUD. If you stumble upon an avatar of the opposite race, you can attack them. If you win the battle, they will be disabled and must return to their Hosts/Legions Soul Crystal to be reactivated.


 Getting Started


To play Beyond the Veil you will need the HUD. There are two HUDs to choose from, Angels or Demons. The only way to get hold of the HUD is to have a demon or an angel ascend you. Once they ascend you, the server will send you the welcome pack. This includes your HUD, a set of wings and either a halo or a pair of horns. There is a free 30 days trial of the HUD which starts once you are ascended.

The HUD 


  1. Immortality Points: The green dots show how much immortality you have.
  2. Scan Area: This will scan the current area and give a list of 10 avatars around you.
  3. Attack Target: This button will be the attack button when the update is released.
  4. Settings: In this button you can see your stats and your progress to the next level. More settings will be added in later patches.

The Soul Crystal


The Soul Crystal is the requirement for all Hosts and Legions. This is where all the souls you group collects are stored. It has the power to reactivate you if you have lost a battle. It can promote you to a new level if you meet the requirements are you leader is present. It is also a great place for the opposite race to come and get some quick souls. So make sure you guard your Soul Crystal. Soul Crystals must be placed on land which is accessible to all. If you find one that is guarded by a security system or blocked land, please report the clan to Raiden Faxel.
The Soul Crystal displays your Host/Legion name, the race you are, how many members and how many souls in total you group have.

 The Spring of Youth

The Spring of Youth is what give Demons and Angels their immortality. To drink from the spring all you need to do is touch it. Each drink will give you one point of immortality. The owner of the group may lock the spring to a clan or lock it from everyone. The Spring of Youth also acts as your groups donation box. No commission is taken from donations so everything benefits your Host/Legion.

If you are interested in getting into this game, please contact the creator Raiden Faxel for more details. Alternately you can contact Sigh Parx to become a demon or Warfina Tisch to become an angel.

Tuesday, 26 May 2015

Second Life - Learn To Script: Chapter 4

Contents


Chapter 4: Lets make a donation box

In this chapter we will be making our next product. This will be a donation box that accepts donations and shows the highest donator. To do this we need to do test to see if the donators amount is higher than the current highest and replace it if it is. To show the highest donated we will use floating text. Lets also make it so the donation box will accept a user and pay that user. That way we are not only learning how to accept payments but also how to send that payment to the person using the donation box.

Lets Get Started

Ok so the first step is to create a script within an object. You should know how to do this by now. I am going to see how much you have learned and let you do the set up scripting. In this script we want to have two states. We learned how to do states in the last chapter so I will leave that up to you to figure out. Lets call the states, default and inUse. Both of these names are without spaces.
In the default stage setup a touch_start event. In that touch event make the script say “Welcome to the donation box Raiden Faxel. You are now logged into me.” . Replace Raiden Faxel with the name of the avatar touching the script. Then make the script swicth to the inUse state.
In the inUse state make a touch_start event and make that event say “Thank you for using me Raiden Faxel. You earned $L0”. Again replace my name with the name of the avatar touching the box. Then switch back to the default stage.
Do you have your script written? Ok... lets see how well you did. Your script should look something like this.
 
How did you do? Yours may be slightly different. Touch the object and test it. If you are see the two messages, a different one each time you touch it then your script is working well and you have learned for the past chapters, well done. If not, take the time out to look at my script and compare it to yours. What did you do different?

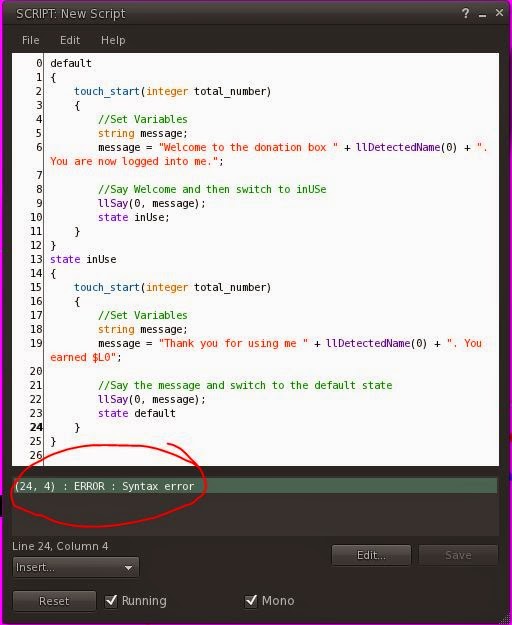
Sometimes when you write scripts you will try to save it and you will get this message.

 
This reads as so. On line 24, character 4 you have an error. You will also notice that the line 24 is in bold. This is showing you that this is the line that has the error. In this example and this can be the most common error, I forgot to place a ; at the end of line 23. The ; tell the script that it is the end of a line. Every line needs one at the end.

llSetText

If you are looking to script in Second Life then you have definitely been around long enough to see objects and people with text above them. It may be something from a floating text above avatars heads or a donation box with some text over it. The llSetText is how this is achieved.
So lets go ahead and add the floating text.
Step 1: Add a state_entry event to each of your default state.

Step 2: Add the following line of code inside the state_entry event.

Step 3: Save your script.
You will notice that the floating text your entered will appear above the prim your script is in.


Before we continue I want to explain what vectors are.

Vectors

Vectors are a group of 3 floats used as a single variable. They are seen as <x,y,z>. They can be used to set locations , velocity, and colours. In locations you have an x, y, z location. With velocity we have speed on x axis, speed on y axis and speed on z axis. In our script we have used the vector for a colour. This is set as an RGB colour code (Red, Blue, Green). You can get all the RGB colours you want from this a quick search on google. Just type RGB colour codes. With the vector x = Red, y = Blue and z = Green.

Alpha

So now we have a little understanding on vectors, the other thing I want to explain is alpha. In the SetText command we have an alpha parameter. The alpha parameter set how invisible the set is. 0.5 will make the text 50% see through. 0 will make is not show at all. 1 will make the text 100% visible play around with your text for a bit changing the colour and alpha.

Clearing Floating Text

If you don't want your text to appear anymore all you have to do is set the text to nothing.

The important thing to remember is this. If you add floating text to your prim, then decide you don't want that anymore, you can't simply remove the line of code that sets the text. This will keep the text there. The prim itself has a text variable and you are just setting it. So if you set the text and then remove this script, the text will remain. Before you remove the script you must first clear the floating text and run the script.

Continue Our Scripting

Ok now let continue with our script. Add a state_entry event to the inUse state. Now add some floating text to the inUse state_entry. Make this one say “Raiden Faxels Tip Jar\nAll Tips Greatly Appreciated\nTop Tipper Sigh Parx $L0”. Of course change the Raiden Faxel to the users name. Later we will change Sigh Parx to the actually highest tipper and the amount they tipped. The \n in the text makes a newline in the floating text. In order to change the name to the user we need to store that name when they log in. We will also store their key for later use. Add this at the top of your script.
Then in the touch_start event of the default state, set these variables with the following code.

Now we can use this variable in the state_entry of inUse to change the floating text to include the users name.
Your code should look like the following.

Accepting Payments

There's only one command you must add to accept payments into an object but there is an event you must add also to run code when someone makes a payment. Without either of these you can not accept payments. So lets look into that. To accept payments into your script you have to set the pay price of the prim. This is done with the following code.
The price integer is the default amount you want in the custom pay box. The list of quick_pay_buttons are the buttons people can press to pay that amount. Before we start this let me explain lists.

List

A list is a group is variables in one variable. You can have a list of all different types of variables except other lists. I like to see a list as an organised box of things you want to use later. For example I can have a list of avatar names. I would write this as follows.
 
Each name in my list has an index number. The first name in the list has 0. Then each index goes up by one. So Raiden Faxel has 0, Sigh Parx would be 1, Roxy Beliveau has 2 and Warfina Tisch has 3. We can use these numbers to get the information later by using the llList2String command.
 
So to get “Sigh Parx” for the list all we type in is this.

 Let's Add The Pay Option

Ok so we are ready to add the pay option.
Step 1: In the state_entry event of the inUse state create a list with four payment prices. I like 50, 100, 200, and 500 as a default.
 
Step 2: Now add in the SetPayPrice command. We'll put the price as 100 and use the quick_pay_button list we just created.
Step 3: Add the money event to the inUse state.
The money event simply gets the avatars key and the amount they donated. We'll look into this very soon.
Step 4: Save your script and test it. Log into your donation box, and then right click the object to select pay. You should see this dialog come up.
 
As you can see our quick pay buttons are on the side and our default amount is in the other amount textbox.
This script is the basics of a donation box. But we are going to go a little further and put the highest donator in the floating text, and we also need to make this pay the person logged in. At the moment it will pay the owner.

How it works

As the script starts the script starts in the default state and waits for someone to touch it. When they log in it moves to the inUse state when the llSetPayPrice command runs and sets the buttons for the donator. Having the money event in as well allows the object to then show the pay option. When an avatar pays an amount they are given a dialog to choose an amount. When they click pay. The amount is taken from them and given to the owner of the object.

GiveMoney

This script is what takes money from you and hands it to another avatar. But there are a few things you need to understand about this command before using it. First of all, there is no way to know if the money was actually sent or not. Lets say the script says to send $500L but the avatar only has $100L. There is no way to test to see if the full amount was paid. There is another command that gives all this information but for this script we are only sending the funds as someone makes a donation, so the money will always be there. Second, a give money command must be accompanied by a permission allowing for the the transfer of funds.
The give money command looks like this.
The destination script is the avatars key where the money will be sent. The amount is the amount of lindens that will be transferred.
Let's add this into our script.
Step 1: Add the permission line of code in the state_entry of the default state. This will ask the owner for the permission to send the donated money to the logged in user.

 
There are many other permissions to give but for now this is the only one we need. As you can see this gets the owners key and requests the PERMISSION_DEBIT permission. The avatar will be sent this permission dialog.
 
Step 2: Add the give money command to the money event we added in the inUse state. We can use the userKey for the destination. We can also use the amount variable in the money event.
Step 3: Save your script. You will be sent the permissions if you have your script in an object in the sim. Accept the permissions,. If you have a second avatar, try logging them on and log them into the donation box. The use you avatar to make a donation. This should pay your first avatar, then your first avatar will pay the avatar using the donation box.
If you use 1 avatar you will see, you have paid [username] [amount] twice. This is because you made the donation which goes to the object owner. Then the object sends that donation to the avatar logged into the donation box, which is also the owner in this case.

How It Works

When the script first starts the owner is asked to accept permissions to take lindens from them. This is required to send the money to the avatar using the donation box. When someone makes a donation the money is sent to the owner and then the script sends that amount from the owner to the person using the donation box.

Notes

There is a lot of worry out there about vampire bites that take your money or other scripts that do the same. This is not possible. For someone to take money from you you need to first accept the permission for the money to be taken from you. If you get a permission and you dont know why, deny it straight away. It is possible to place a give money command inside a product you buy and then drain you money. So if there is no reason for a scrip to to take your money, deny to permission. However if its something that must use money then you kinda need to take that risk. If you see your money draining just take the object out of the world and then money will stop being taken.
The second thing that must happen to take your money, is the object has to be owned by you. No one can make a script to take money from you in an object they own and without permissions. So relax a little with all these scares.

Final Additions

The last thing we need to do is show who made the highest donation to the avatar and a total amount of donations made. Lets just jump in and do it.
Step 1: Add three more global variables. Global variables are ones outside all of the script so we can use them through the whole script. These variables will be...
highestName will be used for the avatars name who donated the highest amount. HighestAmount will be used for the highest amount that avatar donated and totalDonated will be the total amount of lindens the logged in person have raised.
Step 2: In the money event we need to add the amount donated to the totalDonated.
What this says is, “Set the totalDonated to what totalDonated already equals plus the amount the avatar donated.
Step 3: Change the message the user gets when they log out to show the total donated.
 
Use write (string) before totalDonated because totalDonated is an integer not a string and we are trying to add it to a string. This tells the script to treat it as a string.
Step 4: Reset the total donated when they log out. Do this by setting totalDonated to 0 when the script enters the default state_entry event.

If statements

So now lets look at if statements. These run tests on informations to run different code. And if statement looks like this.
The condition is something that must equal true for the code inside the brackets to run. Lets take our code example. We need to see if the donated amount is higher than the current highest donated amount.
However we can not write it like this. The script will not understand.
If we place the if statement in the money event we can use the amount they donated against the highestAmount variable we made. That would look like this.
The code inside the curly brackets will only run if the if statement is true. We have a few things we can use to do tests.
<
Less Than
>
Greater Than
==
Is Equal To
!=
Is Not Equal to
You can also use a string in a if statement. For example if avatarName = “Raiden Faxel”
So lets add it all in.
Step 1: Add the if statement above in the money event.
Step 2: Inside the if statement set the highestAmount to equal the amount.
Step 3: Set the highestName. We do this by running a new command call llKey2Name. This command looks like this.

 
This command takes and avatars key and gives back the avatars name. We can use the id in the money event to get the donators key. Heres the code to set the highestName to the avatar who donated.
Step 4: Set the floating text to show the highest donator. This must be done in the if statement as we only want it to change if the amount is higher.
The final code inside your money event should be.

How It Works

When a user donates, the money event is run the amount donated is added to the total amount and then the money is sent to the avatar using the donation box. The amount is then tested to see if it is bigger than the current highest amount and if it is the amounts are changed and the floated text updated to show the highest donator.

One More Thing For You

At the moment if someone is logged in anyone can log them out just by touching the box. We need to stop this from happening by seeing if the avatar touching the box is the same avatar that has logged in. If not, tell the toucher the donation box is currently in use. The other thing to do is when the user logs out we need to reset the amounts in highest donator. I'll leave this to you to figure out. And show you the code next week.

Tuesday, 12 May 2015

Secondlife - Learn to Script: Chapter 3

Contents

Chapter 2: Let's Make A Key Finder
Chapter 3: Let's Make A Personal Microphone
Chapter 4: Let's Make A Donation Box

Chapter 3: Let's Make A Personal Microphone

Scope of Existence 

Before we start I want to explain the scope of existence. The scope of existence refers to where a variable is valid in comparison to where it was created. A variable is only valid inside the area it was created in. Let’s take a look at the following example.
V was created inside the script but outside everything and so can be used anywhere in the script.
W was created inside the default state. It can be used anywhere within the default state, but it cannot be used in the newState as this is outside its scope of existence.
X was created inside the touch start event of the default state. It can only be used inside this touch event. If newState had a touch start event also, X cannot be used inside that touch event.
Y was created inside the while loop. It can only be used inside this while loop. If you tried to use it elsewhere you would get an error.

Lets Get Started

We have now come to where we will be making our next product and learning the next command and event. The listen event and commands are useful in making our objects talk to each other or even make it so you can talk to your object. Let’s just jump into the deep end on this one and get scripting.
Step 1: Make a new object with a script inside. Call this one “Personal Microphone”. This object we are making is a wearable microphone. When turned on it will shout everything you say. Delete everything in the script to start with an empty script.
Step 2: In this script we are going to have two states. The first being default which is always needed. We are going to treat this as the off state. The second state we need is the on state. Write the two states to get your script started. Your script should look like this
Step 3: We need an event to change from default to on. Let’s set that up with a touch event. Write a touch start event inside each state.
Step 4: We need to tell the script to switch to the other state inside the touch event. If you remember how to do this go ahead and add it in. If not, just look below.
Step 5: Add a state_entry event for each state. The state_entry event runs when the state is entered. So switching to the on state will run the on state's state_entry command. This is written as followed.
Step 6: The last step in setting up this product before we discuss the listen commands is to add in the say command to tell what state the microphone is in.


This is as far as we are going to go for now. Before we continue I need a talk about the listen command and event.

Listen Command

The listen command tells the script to start listening on a set channel and also what things to listen to or listen for. A listen command is written in the following manner.
The parameters are the listen filters. Channel is of course the channel on which we want the script to listen on, ObjectName is the name of the object or avatar we want the script to listen to, TalkerID is the UUID of the avatar we want the script to listen to, and MessageSpoken is the message we want the script to listen for.
Any of these filters we can leave empty in a way to tell the script to listen to everything in that category. For example, if I want the script to listen to any object I would type empty quotes in that filter. If I want to listen for any message I would type empty quotes in that field. The only filter that needs a true input is the channel.
These three listen commands listen for different things. The first one will listen on channel 0 for anything said by any object or any avatar. The second will listen on channel to for an object called “Object” saying anything. The last line will listen on channel 5 for the owner of the object containing the script, saying “Hello”.
The llGetOwner() command will get the UUID or key of the owner that owns the object that the script is in. The NULL_KEY tells the script not to listen to any set key. Basically it makes the key reference empty.
In our microphone script we want to listen to anything the owner of the microphone is saying in global chat. Add this line into the script in the state entry event of the on state.
You code will look similar to this

You can have many listen commands all sent to the save script.
So now we have the script listening to the owner. It can hear everything the owner says. But it will not do anything when it hears it. We have not set up an event to tell the script what to do when it hears the owner. This leads into our next section.

Listen Event

The listen event is executed when the object hears something that fits the listen command filters you set. I listen event has the same parameters as the listen command and are set in the same order. This is how it is written.
All the listen commands will be sent to the same event. The parameters are stored in the variables created in the event eg: integer channel, string name…
Let’s add this into our script and test it out with some say commands in there.
Step 1: Place the listen command under the touch event
Step 2: Add 4 say commands inside the listen event (one for each variable).
Remember, the reason we placed (string) in front of some of these variables is because the say command can only say strings. The variables name and message are already string but we need to cast the integer and the key into strings.
Step 3: Save your script
Step 4: Touch your object to turn it on and then say something.

How it works

Our script starts in the default state. When we touch the object it switches to the on state. When it enters this state the script goes into the state entry event. Inside this event we have a say command telling the avatar the microphone is now turned on. We also have the listen command. This sets the script to listen on channel 0, to any name, to only the owners UUID or key and to listen to anything they say.
How the script is set to listen to anything. We then said something in the global chat. I personally said “Hi”. This starts our listen event, which has our 4 say commands inside it.
What you will notice is the object saying
The first say command is told to say the channel. We spoke in the global channel which is 0. As you can see the object has said 0. Next it was myself, or you in your case, that said something. Our next say command was to say name. In my case it said Raiden Faxel. The following say command was to say the id. The id is the UUID of the avatar or object saying it. My this case is it my UUID or yours in your case. And finally the last say command was to say the message. This is what we actually said. I said Hi. The script has repeated what I have said.
This should hopefully give you an understanding as to what the listen command and event does. There are only a few changes we need to do to finish this
Step 1: In the listen event we just created delete the first 3 say commands leaving only the one that says the message.
Step 2: Change this say command to a shout command.
Step 3: Let’s add some comments to help you understand what is going on.
 
Step 3: Save your script.
Now we just make your object useable. I personal set it to attach to my ear and make it look like a personal microphone. What you make yours look like is entirely up to you.
Congratulations you just made your second product.
The next section of this book we will be learning to do tests on information we are given and run different code from the different results. These are called if statements. For example: If the avatar touching the object is the owner, show them the menu, otherwise, tell them access denied.

With our second product made, I hope you are starting to learn how things work. Next week, we will work on another product a donation box. We will be learning how to receive and send money to and from avatars. 
Until Then Geek It Up

SighFye