Showing posts with label Cool Ideas. Show all posts

Monday, 8 June 2015

Predicting the Future or Early Innovation

Hey guys SighFye here.

Recently I have been reading a lot of posts about what this movie predicted about the future and what that TV show predicted about the future and I was amazed by how many things from TV and movies actually make it in real life. How could the shows of the past predict what we had in the future. Then I started thinking, what if they didn't predict the future? What if they were the earliest of innovators for these products? Maybe, just maybe, these product started production because these shows thought about it and gave the inventors the ideas. These are some I picked from The Jetsons and Back to the Future.

1) Flat Screen TV
Back To The Future
The Jetsons
Real Life
 2) Video Calling
Back to the Future

The Jetsons
Real Life
5) Flying Cars
Back to the Future
The Jetsons
Real Life
4) Hoverboards
Back to the Future

The Jetsons

AND oh yes I have a real life hoverboard. After doing a prank about riding a hoverboard and getting a lot of bad attention for it, Tony Hawk rides a REAL hoverboard.


So what do you think? Did the TV shows and movies predict the future? Or were they the true innovators of the most amazing products? Leave a comment below with your thoughts, share with your friends and don't forget to 1+.

You can also find me on Twitter and here is our Facebook Page.

Thanks of reading guys, don't forget to geek it up.

SighFye

Saturday, 6 June 2015

NES-top Computer: Part 6

Hey guys SighFye here and the last parts finally came for my NES-top PC. So lets get down and get this thing completed.

This is part 6 of the NES-top build. If you have not yet read about it, you can start by clicking here.

The last parts I was waiting for was the blu-ray drive and the micro-sata to sata adapter. To connect the drive to the case I screwed a bracket to the drive and then glued it to the case using an epoxy glue. The second bracket isn't screwed into the drive its just glued into place. This should allow me to unscrew the one screw and the pull the drive out if I ever need to replace the part.

I hooked up the sata and power and also glued the fan in place. Its a little hard to see as all the wires are on top of it.

The last step was to create a switch. I took the switch cable out of an old PC I had and hooked it to the motherboard. Using the original switch bracket I forced the switch into a groove that was already there which lined up nicely with the power button. Unfortunately
there was a little gap making the button no touch the switch.

To fix this I took a part of the old switch, cut it shorter and clicked it into the button. This closed the gap nicely. But I discovered a new problem. Since I had forced the switch into the groove, it was squeezing the edges and made the switch not work. I had to remove it and think of another idea. While removing the switch I accidentally pulled one of the wires off. So now I have a broken switch. Back to the drawing board for that one.

I decided to close the case and boot the NES up. I may not have a working switch but I can get the system installed and running. I installed Windows 7 and Kodi. Windows 7 boots straight into Kodi making it the primary operation. Its a nice program that makes a home theatre system easy.

You may also notice I painted the NES too. The bottom is painted metallic charcoal and the top is silver. Personally the silver isn't shiney enough and I do plan to repaint this part.

So now I am only waiting on a new switch. I have to wait til payday for that one. I also need to add two USB ports where the old controller ports were.

Until then readers thanks for reading.

You can find me on twitter or like our facebook page. Also don't forget to comment, 1+ and share :)

SighFye

Thursday, 23 April 2015

NES Mods

Since I have been working on a NES mod with my NES-top, it got me thinking what have others have made from the NES? There are some really cool ideas out there some of which I really want to make.

Alarm Clock / iPod dock

Toaster

This is by far the best...


Bag
Then I stumble across so awesome ideas for NES accessories...
This is one of my favourites.

Would be a cool purse for a lady friend

How awesome would this be for a lan center.
I'm sure there are so many more out there. If you find a cool addition, add it into the comments.

SighFye

Saturday, 18 April 2015

NES-Top Computer: Part 5

Hey Guys, SighFye again...

If you haven't yet read the rest of this topic, start from the... well start right here.

Before I start on the progress I realised, in the last post I mentioned that the power supply had been ordered but did not add it to the price. So here it is.


ITEM:  picoPSU-120 + 8.5A (102W) Power Kit
PRICE:  $149 + $15 Postage
TOTAL CURRENT PRICE OF BUILD: $372.98
Now as you can see in the picture, there is only 1 sata power, so to add enough for 2 internal drives and a bluray drive I have bought myself a molex power to 2 x sata power adapter.


ITEM:  Dual Sata power cable
PRICE:  $13.63
TOTAL CURRENT PRICE OF BUILD: $386.61

Today I went out to get the last parts. I couldn't get hold of a slim slot bluray drive but I did get everything else I needed.

ITEM:  Fujitsu 64GB SSD Drive
PRICE:  $71.82
TOTAL CURRENT PRICE OF BUILD: $458.43
This should give me a speedy boot up. I don't want to have to wait for the NES to boot just to watch a DvD.

ITEM:  8GB DDR3 1600Mhz Sol-Dimm
PRICE:  $90.00
TOTAL CURRENT PRICE OF BUILD: $548.43

ITEM:  Deep Cool SF-500 Fan
PRICE:  $13.64
TOTAL CURRENT PRICE OF BUILD: $562.07

When I added the power supply to the motherboard my risers that I glued on snapped off. If you remember I glued 2 of them in the wrong spot so it was only held on by 2 of the screws. So I had to repair this and this time I was doing it right. I screwed all the risers onto the motherboard before gluing them in place as suggest by twitter follower @Oz Ravenheart. This ensured all the risers sat exactly were they were needed.

 I then made up some brackets for the SSD drive to screw to. I changed my plan a little and decided to have the SSD standing up on its side. I made the brackets and glued them in place using the same method as the motherboard. Unfortunately, once again, my master builder skills came into play and I didn't take into account the SSD drive was too high for the top housing. Since the brackets were already glued into place I decided to bend them on an angle to lower the height of the drive.

I added the RAM and now the NES is almost complete.
All it needs now is the Blu-ray drive, a 2TB HDD and the buttons made for the front. I already have a HDD from a previous build so that's not going to cost me zip but the size of it does concern me. I may not be able to fit it in with the bluray drive. I haven't added the fan yet as I am trying to decide where it should go. There are vents at the top and bottom of the NES both of which would hold the fan nicely. My thoughts are, 1) heat rises so the fan should be on top. 2) Dust falls so to prevent the dust being sucked in it should be on the bottom.

So that's where the build is sitting for now. I have purchased the keyboard and mouse combo...
ITEM:  Kaiser Baas Mini Blu-tooth Keyboard.
PRICE:  $50.00
TOTAL CURRENT PRICE OF BUILD: $612.07

... and of course I need the blu-tooth adapter to be able to use it. This will plug into one of the USB ports at the back.
ITEM:  USB Bluetooth Dongle Ver 4
PRICE:  $26.82
TOTAL CURRENT PRICE OF BUILD: $638.89

So that's the build so far guys... It's turning out to be a lot more expensive than I first thought, but I guess that's living in the country.

Next step, rebuild the switches and get a Blu-Ray drive.
Until then, stay geeky...

Continue Reading Right HERE

SighFye

Wednesday, 8 April 2015

NES-top Computer: Part 4

 Hey guys SighFye here,

This is part 4 of the NES-top build. If you have not yet read about it, you can start by clicking here.

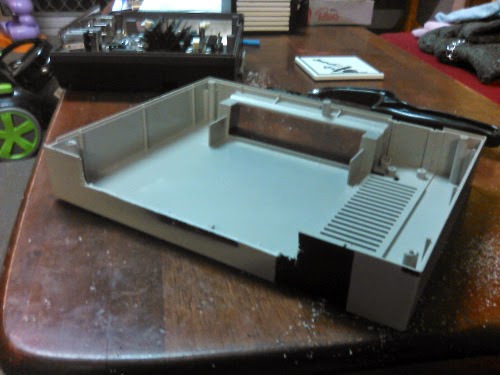
The motherboard has arrived so now I can prepare the NES housing. First thing is to see where the motherboard can sit and chop all the plastic risers and anything else in the way. The only way I could chop them with my hacksaw was to chop the back out first. This makes way for the motherboard port plate too.
I used some of the rises I cut off and glued them in place where the motherboard screws needed to be. Being the master engineer I am, I glued 2 in the wrong spot and a few at the wrong heights so only 2 screws on hold the motherboard in place. But it is held firmly so I see no issue with it.
Next top top housing need to be cut to allow room for the port plate.
Putting the two parts back together (not screwing them as a lot more needs to be added) I get this...
Ignore the paint marks, I am also in process of painting the NES and choosing colours too, but that will be another post towards the end of it all.

Now the motherboard is in place I have found my next obstacle. The front switches no longer fit in their place.
Being an old system the switches are rather large. A quick Google brought me to a simple solution.

These are small switches that do the same thing. Gluing the original front of the button to these will cut down the space needed.

On another note, some of the parts I placed on Ebay have sold bringing my total cost down a little.
ITEM: 6 items sold on Ebay
PRICE:  $25.81
TOTAL CURRENT PRICE OF BUILD: $239.17

So that's it for now. The power supply has been ordered from mini-box.com.au and I am heading into the city on Friday. I should be able to pick up the hard drive, blu-ray drive and ram.

Until then... stay geeky

Read the next part right here

SighFye

Wednesday, 18 March 2015

NES-top Computer: Part 3

Hello Guys, SighFye again

If you haven't read about the NES-top yet click here.

The NES arrived in the post the other day. On first look I was a little disheartened as the console is rather discoloured. Now I know it's an old system and finding one it better condition would not be very easy so all in all I am happy with it.

Stripping the console down was rather an interesting task and I learned something I did not know about the NES. At the bottom of the NES is a port. The housing would need to be cut to access it but half of the plastic is already cut for you. I looked in forums for what this was and there are a lot of speculations. One thing was an unreleased Minnesota State Lottery cart, another being controllers.

Don't worry I didn't cut mine. This is from Google

So I have the NES in pieces and have placed all the parts on Ebay to try of set the cost a little. I already have a bit on two items so that's something to take of the cost. The parts I am left with are The Housing, the front switches and all the screws.

Now as I said the NES is a little discoloured. A lot of people think it should stay that way as it makes it more vintage but I think I agree with a post I saw. I do not like urine coloured plastic. Bellistik and I looked on the net for painted NES's and my oh my are there some nice looking machines. I have decided I will also paint my NES. I haven't fully decided how but that can be another post when I get to it.


The ASRock Q2900 motherboard has also been purchased from PC Case Gear.

ITEM: ASRock Q2900 ITX Intel Quad Core J2900 2.67GHz
PRICE:  $149 + $17.98 Postage
TOTAL CURRENT PRICE OF BUILD: $264.98

I was going to prepare that NES before the motherboard came but I want to see if I can use any of the screw mounts already in the housing. Saves me having to glue some in.

So that's it for now guy. Now we wait for the motherboard to arrive.

To read the next post in this series click here.

Until then
Geek it up!

SighFye