Showing posts with label Mods. Show all posts

Monday, 15 June 2015

Modded Minecraft Monday - Week 1 - Farming

Hi everybody. We're a week into the lets play, so I'd like to show you what I've been up to.
I've mostly been playing it safe and trying to set up a defensible home base with renewable food supplies before I venture out into the wilderness.

Tree-houses are super defensible! :3
Initially I collected as many different types of seeds as I could get my hands on. I quickly realised that the Moso Bamboo that grew nearby was extremely useful as building material as it can be replanted anywhere, grows quickly and can be harvested quickly as well. I used it to set up fenced fields and lit them with torches made from coal ores in a nearby mine shaft.

Quick growing crops, plentiful and useful as building materials :3
You can barely tell that's a Treehouse on the left! :D
Having established a base, I decided to explore my immediate surroundings and found a nearby village with an empty house, a Tinkers Construct Forge & Tool-house and a MystCraft vendor's house. For now I will leave this village be so it doesn't get taken over by zombies, but I might come back for that forge later. There was also a floating sky village and a floating dungeon, that could both be seen from the village on the ground, but for now they are out of my range.

It's a village.. but in the sky... :O
 There were two minor changes to the mod-pack during this first week. 
First, I found it extremely easy to locate loot bags, which seemed to drop from every second or third enemy and often contained quite powerful gear, including enchanted diamond armour and tools. This obviously unbalances the game severely, especially since the Lycanite's mobs mod was removed last week, which made surviving aggressive mobs much easier at night time. I tweaked the config file for this mod so that the chance of a loot bag being dropped by any mob is 10 times less likely.
The second change was to add the mod called Natura, which simply adds some grow-able food crops and bushes and spawns great, huge, Redwood trees into the game, which make great tree-houses.

Now that I've established a nice home base, I'll be highlighting a particular mod for a week at a time so that anyone playing along can explore all the nuances of the individual mods, that they might have missed otherwise.

If you are playing along at home, I have updated the download link below to include the extra mod changes and the map that I'm playing on, as it is now. You can use it to see what I've been up to yourself and explore all the stuff that I've been toying with. I always loved seeing how other people built their worlds in Minecraft servers online and I figure you guys would like it too :3

A word of warning though. My computer may be 5 years old now, but it has a decent graphics card, 8GB of ram and an i7 cpu. My computer plays it ok given plenty of ram and patience, however it's extremely slow and laggy when new areas are loading for the first time and it can take several minutes to start up every single time. One of the main reasons for settling in and setting up a home base was to give the rest of the game time to generate and settle so it could be played smoothly. If you have the patience (or a super-computer?) go for it! Otherwise, you might want to pass on it.

Monday, 8 June 2015

Modded Minecraft Monday - Failure & Renewal

Hello everybody. It's time to check in on our modpack lets play.

Unfortunately there have been a few small issues with the modpack, so whilst I have been playing it for the last week, I eventually found some issues that forced me to make some changes before starting the official let's Play. 

First of all was the difficulty curve. I had intended to make the game a bit more challenging to survive in, but I may have gotten a bit carried away.

I lost count of the number of times I died when the sun went down...
It was extremely difficult to survive at night due to the large quantity of powerful hostile mobs that would spawn in darkness. Lava was also nearly impossible to get close to, as several highly powerful mobs would spawn in the lava, both underground and on the surface in lava pools. I was also notified by a user that starting a new map was impossible since the modpack would crash immediately upon the world loading. After a bit of error tracing, I found the culprit was the Lycanite's Mobs Mod, which would crash the game when trying to spawn the player for the first time. Noticing an opportunity to kill two birds with one stone, I simply removed Lycanite's Mobs which solved both issues. I also changed the starting health amount to the default of 10 hearts instead of 3 since most mobs were one-hit killing the player, which is no fun. It is no longer immediately suicidal to venture outside when it's dark and players can successfully start new worlds.

Next was the limitations of wooden chests and default vanilla bookshelves not actually storing books...
No house is complete without an attic library :3

I added two new mods in order to make chests that could be upgraded with iron, gold, diamond and obsidian to increase their inventory size and to make bookshelves which actually store books for visual appeal and easy retreival :3

Additionally, there was a bug where it was impossible to craft a stone button. Ordinarily this wouldn't be an issue since the underground biomes mod adds buttons for each stone type, however the pokeball mod won't use those buttons. Only the default vanilla stone buttons.

I had two options. Either I could just make buttons something you had to find in dungeon loot only, making pokeballs extremely rare, or I could add another mod that allows me to fix the recipe that is broken. I opted for #2 so you can now craft buttons the way you're supposed to be able to.

Now I did get a full week of gameplay out of this modpack, however when I went to open minecraft a few minutes ago, my map's level data was corrupted. (probably as a result of me pressing the shutdown button without realising Minecraft was still running... Save worlds before shutting down kids) so this might be a good time to start a new map for the new modpack configuration.

I chose to simply provide you guys with a seed this time instead of the entire map files. That way the file size of the modpack will be reduced and you can regenerate the map if you have issues.

I allowed cheats for screenshot purposes only.
I visited a site that converts text into binary and typed in "Gettin My Geek On" but that was way too long in binary, so I simplified to "GMGO" which turned out to be "010001110100110101000111" in binary, so I used that for the new lets play map. I'll be starting that next week, but here's what I've been up to for the last week.

I spawned near the ocean and decided to create my base on top of the water to make it more difficult for enemy mobs to enter my safe areas.

Cobblestone appears to float surprisingly well!
Nearby I found several fruit trees. These are perfect for a renewable food supply, so I cut down an apple tree to get some apples and saplings. In order to make a sapling that will grow into a fruit tree, you need to combine a sapling and a peice of fruit in a crafting area.

Nope. Not ripe yet.
After setting up a base and a farm with some apple trees nearby, I decided to set out to find adventure. I headed west by boat and a short distance away from my spawn area I spotted this giant brick structure underneath the water that seemed to be made up of a lot of square rooms.

The thing under the water... I know there's a floating island there lol
I decided to investigate and discovered a massive sprawling underground Treasure dungeon from the Dungeon Pack mod. On another nearby island I also found my first lucky block. When I destroyed it, two more lucky blocks spawned with a sign in between them. The sign simply stated "one is lucky, the other is not" however one spawned a bunch of cool vanilla items like hoppers, chests, buttons, redstone torches and other useful tidbits and the other spawned a lucky villager. I got lucky. One of those blocks could have killed me instantly.

Jokes on them. Both were lucky :3
I also found some Chocobos and brought them back to base with pokeballs :D
I ventured into the dungeon a few times and got some interesting loot, but not long afterwards I shut down my pc whilst the game was running and my world corrupted.

I updated the modpack and it can be downloaded at the bottom of this post if you want to try it out.

I have done my best to make the game fun and more diverse, but as with all modpacks you should expect bugs and crashes ocasionally. Most of the time you can just relaunch Minecraft and continue where you left off though.

Ok, well that's about it for this week. I'm writing this week off as bug-testing time and going to start fresh for the next post. See you then! :D

Modpack Download Link: https://dl.dropboxusercontent.com/u/76107282/GettinMyMinecraftOn.zip

Saturday, 6 June 2015

NES-top Computer: Part 6

Hey guys SighFye here and the last parts finally came for my NES-top PC. So lets get down and get this thing completed.

This is part 6 of the NES-top build. If you have not yet read about it, you can start by clicking here.

The last parts I was waiting for was the blu-ray drive and the micro-sata to sata adapter. To connect the drive to the case I screwed a bracket to the drive and then glued it to the case using an epoxy glue. The second bracket isn't screwed into the drive its just glued into place. This should allow me to unscrew the one screw and the pull the drive out if I ever need to replace the part.

I hooked up the sata and power and also glued the fan in place. Its a little hard to see as all the wires are on top of it.

The last step was to create a switch. I took the switch cable out of an old PC I had and hooked it to the motherboard. Using the original switch bracket I forced the switch into a groove that was already there which lined up nicely with the power button. Unfortunately
there was a little gap making the button no touch the switch.

To fix this I took a part of the old switch, cut it shorter and clicked it into the button. This closed the gap nicely. But I discovered a new problem. Since I had forced the switch into the groove, it was squeezing the edges and made the switch not work. I had to remove it and think of another idea. While removing the switch I accidentally pulled one of the wires off. So now I have a broken switch. Back to the drawing board for that one.

I decided to close the case and boot the NES up. I may not have a working switch but I can get the system installed and running. I installed Windows 7 and Kodi. Windows 7 boots straight into Kodi making it the primary operation. Its a nice program that makes a home theatre system easy.

You may also notice I painted the NES too. The bottom is painted metallic charcoal and the top is silver. Personally the silver isn't shiney enough and I do plan to repaint this part.

So now I am only waiting on a new switch. I have to wait til payday for that one. I also need to add two USB ports where the old controller ports were.

Until then readers thanks for reading.

You can find me on twitter or like our facebook page. Also don't forget to comment, 1+ and share :)

SighFye

Monday, 1 June 2015

Modded Minecraft Monday - The Modpack Contents


Hello again. I have been fairly quiet for a bit and this post explains most of the reason why. I have been assembling a collection of mods for a modded Minecraft playthrough and, as anyone who has explored minecraft mods can attest, it's pretty addicting to keep adding new mods when you come across them. I have finally settled on a list of mods that I'm happy with so it's time to start a Let's Play series of blogs.


To begin with, I'd like to state that I'm not particularly a fan of modpacks like Technic or FTB. I have enjoyed playing them in the past, but I feel like the extra machinery and pipes and wires overcomplicate and distract from the core minecraft experience. Thus I have tried to stick to mods that, whilst adding new content, accentuate or expand on the core minecraft experience without overcomplicating it.

There are a lot of new hostile mobs added which does make the game rather difficult at night time, but hopefully I've balanced it out with enough extra ore and loot mods to make your arsenal much easier to upgrade quickly. The Extra Health Enchanted mod also starts you off with only three hearts and allows you to expand your maximum health by leveling or adventuring in dungeons, thereby allowing for a much better difficulty curve. It should be really hard at first, but as you level and progress through the game it should get significantly easier to survive.

Modpack Contents:


  • ExtrabiomesXL - Adds 28 new biome types to the game for added landscape variety.
  • Pam's Mods - Adds tons of new  plants and a few minor tweaks. 
    • Harvestcraft - New farmable crops, fruit trees, bushes and food.
    • Desertcraft - New desert flora
    • Random Plants - New Venus Fly-Trap plants.
    • Mob Drop Crops - New rare plants that drop hostile mob items like bones and ender pearls.
    • Wheee Flowers! - More flowers!
    • Bonecraft - Adds fossils to terrain generation which drop bones when mined.
    • Clay Spawn - Clay will now also spawn underground with the same rarity as iron ore.
    • Get All The Seeds - Adds all of the available seed types to the list of drops when breaking tall grass. New seed types will drop extremely rarely. 
  • Plant Megapack - Adds tons of new plants!
  • Underground Biomes - Adds different types of rock that have their own biome types underground. Lots of new stone types to play with!
  • Dungeon Pack - New randomly generated structures, including large underground dungeons and ships on the water!
  • Mystcraft - Based on the game and book series. Allows the crafting of books that contain entire worlds based on the runes you use to define that world.
  • ChickenShed - Chickens will now randomly drop feathers like they do with eggs.
  • WAILA - "What Am I Looking At?" is a mod that provides a HUD at the top of the screen that describes what what you are looking at and what mod it comes from. (Needed this to keep track of all the ores and underground biomes rock types)
  • Mr Crayfish's Construction Mod - Adds a block that will build a building for you. You still need to gather all the materials required and spend time punching the block to build it, so this is more a way of creating templates to rebuild a certain building than a cheat. It balances out with the recipe requirements anyway.
  • Easy Crafting - Adds a new crafting table with a more expensive recipe that shows you everything you can make with the items in your inventory. You click the object you want to make and it creates it for you using the items in your inventory. Works much like the console crafting menu does.
  • Fast Leaf Decay - Because I hate floating leaf blocks when I cut down a tree...
  • Minecraft Graves - Instead of dropping everything, the game will spawn a gravestone containing all of your items where you died. Saves your items, but you do have to get back to where you died to retrieve them.
  • Harder Peaceful - Removes the automatic player health regeneration feature from Peaceful mode and enables hunger in Peaceful mode. Food now has a purpose in Peaceful mode! :D
  • Infernal Mobs - Adds rare variants of regular mobs with randomised Diablo-stlye buffs. Kind of like mini-bosses.
  • Item Physics - Items will drop to the ground properly without sitting there and spinning in place.
  • More health Enchanted - Start with only 3 hearts of health maximum. Leveling will add more hearts. Hearts can also be added using items crafted from heart containers, found in dungeon chests. There is no maximum quantity for hearts so it makes you more resilient as you get further into the game.
  • Dual Hotbars - Adds another 8 slot hotbar that uses the top row of your inventory. I often find myself short on slots, so having 16 instead of 8 really helps :3
  • Lucky Blocks - Mining this block is like pulling a slot machine. You might get killed by an unlucky Lucky Block and you might get some awesome loot from a really lucky Lucky Block.
  • Roxa's Tall Doors - Adds doors that are much larger than the default doors. (2x3 and 3x4 etc)
  • Carpenter's Blocks - Adds slopes to minecraft! :D
  • ComputerCraft - Adds programmable computers and robotic blocks called turtles that can build, mine and farm for you if programmed correctly.
  • DecoCraft - Decorative blocks and furniture.
  • Greg's Lighting - Redstone floodlights that can project light down a hole or corridor.
  • Horizontal glass - Glass panes that can be placed horizontally as a floor or roof.
  • Luppi's Ladders - rope ladders that can hang from a ledge, strong ladders that can stand unsupported and blocks that will retract both when powered with redstone. (good for treehouses)
  • Deconstruction Table - Found some loot but have no use for it? Break it down to its core components and recycle! :D
  • Mr Crayfish's Furniture Mod - More decorative furniture :3
  • Malisis's doors - Adds a smooth swinging animation for doors, makes double doors act together and adds new customisable door types.
  • Mowzies Mobs - Currently only adds a larger, animated and far more nasty version of a Venus Fly Trap to the jungle biomes.
  • Butterfly Mania - Having 202 new types of butterflies fluttering around just gives the game an extra feeling of life.
  • Choco Craft - Adds tamable, breedable and ridable Chocobos!
  • Mo'Creatures - Adds a large number of Animals and Peaceful mobs as well as some enemies.
  • Backpacks - Adds backpacks in two sizes and multiple colors. They take up one inventory slot and when right clicked, open a chest-like inventory to store things in.
  • Loot bags - Enemies have a chance to drop a bag full of loot on death. The common bags could have some seeds and a scrap of leather and legendary loot bags might have enchanted diamond armour and a rare weapon. Its all random. Added this one to balance out the difficulty of all the new hostile mobs.
  • Lost books - Mostly just adds any books the player dropped and lost to a list and enemies have a chance of dropping them. Can also customise with your own unique book sets.
  • Pokeball Mod - Adds a ball that a single entity can be stored in. Store enemies or friendlies by right clicking to throw it at them. Good for relocating animals and villagers.
  • Xeno's Reliquary - Adds a bunch of craftable relics that have special effects.
  • Tinker's Construct - A smelting and tool crafting mod.
  • Balkon's Weapons - Adds a bunch of new weapon types, including a firearm.
  • More Bows - Adds new craftable bow types.
  • Not Enough Items - A searchable list of all items in the game. It shows the recipes and uses for each item and can be narrowed by item type or mod. Very useful.
  • Bibliocraft - Usable bookcases, shelves that display their contents and more.
  • Iron Chests - Upgradeable chests.
  • Better Foliage - Leaves blocks now have additional leaves to break up the blockiness and grass blocks now have short grass sticking out the top.
In addition to trying to find a 64 pixel texture pack for the majority of these mods, there are also a few core mods installed, that these mods rely on, that I didn't name as well, for brevity's sake.

Example of folder structure
If you want to play along, I have packaged up the lot and stuck it on my dropbox so you guys can grab it HERE if you like. It's ready to go with all the mods already set up and a copy of the same map I'll be playing in. You will need your own Minecraft account in order to play it though, if you so choose.

Please keep in mind that the custom minecraft launcher I made, to run it in the downloaded folder instead of in the user folder, is sensitive to spaces in folder names and long file paths. 
Best to put the lot in "C:/Minecraft/" to avoid issues. You will need the two files "Minecraft.exe" and "PortableMinecraftLauncher.hta" in there as well as the "GettinMyGeekOn" folder (which contains the game + mods + the map).

Once it's set up like this, it won't affect any other modpacks you have installed. It will just run isolated in that one folder. You will have to launch "PortableMinecraftLauncher.hta" (by double clicking) instead of "Minecraft.exe" though, in order to make it run locally.

Ok, well that's about it for the contents of the modpack so I should probably go start playing now. Since the spawn area for this map is relatively close to the ocean on the beach, I might build my base on the water :3

I really hope there are no sharks around here...


See you next time! :D

*Edited Monday 1/6/15 - Added two new mods (Iron Chests & Bibliocraft) & included another mod that was not mentioned in the list (Better Foliage). Modpack on dropbox has also been updated to include the two new mods.

*Edited 5:55pm Tuesday 2/6/15 - Bugfix - Player spawn crippled, so new worlds would crash immediately. - Removed Lycanites Mobs Mod and it works just fine now. If you don't want to redownload, just go to C:/Minecraft/GettinMyGeekOn/.minecraft/mods/ and delete "LycanitesMobsComplete 1.10.13.2 [1.7.10].jar". That should fix the problem. Otherwise, the dropbox link should update within about an hour and then you can download that instead.

*Edited 6/6/15 - I have been made aware that this modpack breaks your ability to create buttons from stone and thus some specific mods (pokeball for example) will not work with the underground biomes buttons. I have added a new mod that adds in a new recipe that does the same thing. I will update the downloadable copy when I make my first Let's Play post on monday.

Thursday, 23 April 2015

NES Mods

Since I have been working on a NES mod with my NES-top, it got me thinking what have others have made from the NES? There are some really cool ideas out there some of which I really want to make.

Alarm Clock / iPod dock

Toaster

This is by far the best...


Bag
Then I stumble across so awesome ideas for NES accessories...
This is one of my favourites.

Would be a cool purse for a lady friend

How awesome would this be for a lan center.
I'm sure there are so many more out there. If you find a cool addition, add it into the comments.

SighFye

Saturday, 18 April 2015

NES-Top Computer: Part 5

Hey Guys, SighFye again...

If you haven't yet read the rest of this topic, start from the... well start right here.

Before I start on the progress I realised, in the last post I mentioned that the power supply had been ordered but did not add it to the price. So here it is.


ITEM:  picoPSU-120 + 8.5A (102W) Power Kit
PRICE:  $149 + $15 Postage
TOTAL CURRENT PRICE OF BUILD: $372.98
Now as you can see in the picture, there is only 1 sata power, so to add enough for 2 internal drives and a bluray drive I have bought myself a molex power to 2 x sata power adapter.


ITEM:  Dual Sata power cable
PRICE:  $13.63
TOTAL CURRENT PRICE OF BUILD: $386.61

Today I went out to get the last parts. I couldn't get hold of a slim slot bluray drive but I did get everything else I needed.

ITEM:  Fujitsu 64GB SSD Drive
PRICE:  $71.82
TOTAL CURRENT PRICE OF BUILD: $458.43
This should give me a speedy boot up. I don't want to have to wait for the NES to boot just to watch a DvD.

ITEM:  8GB DDR3 1600Mhz Sol-Dimm
PRICE:  $90.00
TOTAL CURRENT PRICE OF BUILD: $548.43

ITEM:  Deep Cool SF-500 Fan
PRICE:  $13.64
TOTAL CURRENT PRICE OF BUILD: $562.07

When I added the power supply to the motherboard my risers that I glued on snapped off. If you remember I glued 2 of them in the wrong spot so it was only held on by 2 of the screws. So I had to repair this and this time I was doing it right. I screwed all the risers onto the motherboard before gluing them in place as suggest by twitter follower @Oz Ravenheart. This ensured all the risers sat exactly were they were needed.

 I then made up some brackets for the SSD drive to screw to. I changed my plan a little and decided to have the SSD standing up on its side. I made the brackets and glued them in place using the same method as the motherboard. Unfortunately, once again, my master builder skills came into play and I didn't take into account the SSD drive was too high for the top housing. Since the brackets were already glued into place I decided to bend them on an angle to lower the height of the drive.

I added the RAM and now the NES is almost complete.
All it needs now is the Blu-ray drive, a 2TB HDD and the buttons made for the front. I already have a HDD from a previous build so that's not going to cost me zip but the size of it does concern me. I may not be able to fit it in with the bluray drive. I haven't added the fan yet as I am trying to decide where it should go. There are vents at the top and bottom of the NES both of which would hold the fan nicely. My thoughts are, 1) heat rises so the fan should be on top. 2) Dust falls so to prevent the dust being sucked in it should be on the bottom.

So that's where the build is sitting for now. I have purchased the keyboard and mouse combo...
ITEM:  Kaiser Baas Mini Blu-tooth Keyboard.
PRICE:  $50.00
TOTAL CURRENT PRICE OF BUILD: $612.07

... and of course I need the blu-tooth adapter to be able to use it. This will plug into one of the USB ports at the back.
ITEM:  USB Bluetooth Dongle Ver 4
PRICE:  $26.82
TOTAL CURRENT PRICE OF BUILD: $638.89

So that's the build so far guys... It's turning out to be a lot more expensive than I first thought, but I guess that's living in the country.

Next step, rebuild the switches and get a Blu-Ray drive.
Until then, stay geeky...

Continue Reading Right HERE

SighFye

Wednesday, 8 April 2015

NES-top Computer: Part 4

 Hey guys SighFye here,

This is part 4 of the NES-top build. If you have not yet read about it, you can start by clicking here.

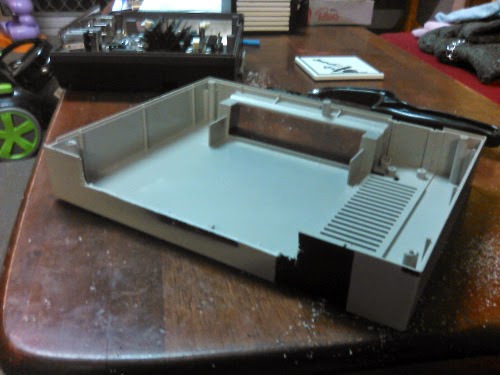
The motherboard has arrived so now I can prepare the NES housing. First thing is to see where the motherboard can sit and chop all the plastic risers and anything else in the way. The only way I could chop them with my hacksaw was to chop the back out first. This makes way for the motherboard port plate too.
I used some of the rises I cut off and glued them in place where the motherboard screws needed to be. Being the master engineer I am, I glued 2 in the wrong spot and a few at the wrong heights so only 2 screws on hold the motherboard in place. But it is held firmly so I see no issue with it.
Next top top housing need to be cut to allow room for the port plate.
Putting the two parts back together (not screwing them as a lot more needs to be added) I get this...
Ignore the paint marks, I am also in process of painting the NES and choosing colours too, but that will be another post towards the end of it all.

Now the motherboard is in place I have found my next obstacle. The front switches no longer fit in their place.
Being an old system the switches are rather large. A quick Google brought me to a simple solution.

These are small switches that do the same thing. Gluing the original front of the button to these will cut down the space needed.

On another note, some of the parts I placed on Ebay have sold bringing my total cost down a little.
ITEM: 6 items sold on Ebay
PRICE:  $25.81
TOTAL CURRENT PRICE OF BUILD: $239.17

So that's it for now. The power supply has been ordered from mini-box.com.au and I am heading into the city on Friday. I should be able to pick up the hard drive, blu-ray drive and ram.

Until then... stay geeky

Read the next part right here

SighFye

Wednesday, 18 March 2015

NES-top Computer: Part 3

Hello Guys, SighFye again

If you haven't read about the NES-top yet click here.

The NES arrived in the post the other day. On first look I was a little disheartened as the console is rather discoloured. Now I know it's an old system and finding one it better condition would not be very easy so all in all I am happy with it.

Stripping the console down was rather an interesting task and I learned something I did not know about the NES. At the bottom of the NES is a port. The housing would need to be cut to access it but half of the plastic is already cut for you. I looked in forums for what this was and there are a lot of speculations. One thing was an unreleased Minnesota State Lottery cart, another being controllers.

Don't worry I didn't cut mine. This is from Google

So I have the NES in pieces and have placed all the parts on Ebay to try of set the cost a little. I already have a bit on two items so that's something to take of the cost. The parts I am left with are The Housing, the front switches and all the screws.

Now as I said the NES is a little discoloured. A lot of people think it should stay that way as it makes it more vintage but I think I agree with a post I saw. I do not like urine coloured plastic. Bellistik and I looked on the net for painted NES's and my oh my are there some nice looking machines. I have decided I will also paint my NES. I haven't fully decided how but that can be another post when I get to it.


The ASRock Q2900 motherboard has also been purchased from PC Case Gear.

ITEM: ASRock Q2900 ITX Intel Quad Core J2900 2.67GHz
PRICE:  $149 + $17.98 Postage
TOTAL CURRENT PRICE OF BUILD: $264.98

I was going to prepare that NES before the motherboard came but I want to see if I can use any of the screw mounts already in the housing. Saves me having to glue some in.

So that's it for now guy. Now we wait for the motherboard to arrive.

To read the next post in this series click here.

Until then
Geek it up!

SighFye