Showing posts with label Tutorial. Show all posts

Tuesday, 26 May 2015

Second Life - Learn To Script: Chapter 4

Contents


Chapter 4: Lets make a donation box

In this chapter we will be making our next product. This will be a donation box that accepts donations and shows the highest donator. To do this we need to do test to see if the donators amount is higher than the current highest and replace it if it is. To show the highest donated we will use floating text. Lets also make it so the donation box will accept a user and pay that user. That way we are not only learning how to accept payments but also how to send that payment to the person using the donation box.

Lets Get Started

Ok so the first step is to create a script within an object. You should know how to do this by now. I am going to see how much you have learned and let you do the set up scripting. In this script we want to have two states. We learned how to do states in the last chapter so I will leave that up to you to figure out. Lets call the states, default and inUse. Both of these names are without spaces.
In the default stage setup a touch_start event. In that touch event make the script say “Welcome to the donation box Raiden Faxel. You are now logged into me.” . Replace Raiden Faxel with the name of the avatar touching the script. Then make the script swicth to the inUse state.
In the inUse state make a touch_start event and make that event say “Thank you for using me Raiden Faxel. You earned $L0”. Again replace my name with the name of the avatar touching the box. Then switch back to the default stage.
Do you have your script written? Ok... lets see how well you did. Your script should look something like this.
 
How did you do? Yours may be slightly different. Touch the object and test it. If you are see the two messages, a different one each time you touch it then your script is working well and you have learned for the past chapters, well done. If not, take the time out to look at my script and compare it to yours. What did you do different?

Sometimes when you write scripts you will try to save it and you will get this message.
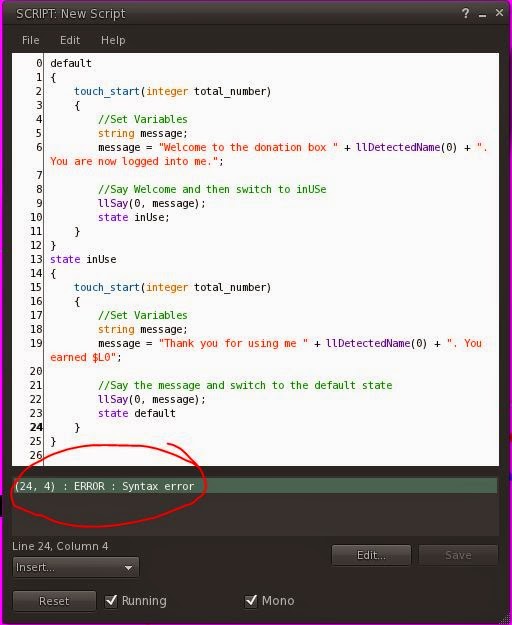
 
This reads as so. On line 24, character 4 you have an error. You will also notice that the line 24 is in bold. This is showing you that this is the line that has the error. In this example and this can be the most common error, I forgot to place a ; at the end of line 23. The ; tell the script that it is the end of a line. Every line needs one at the end.

llSetText

If you are looking to script in Second Life then you have definitely been around long enough to see objects and people with text above them. It may be something from a floating text above avatars heads or a donation box with some text over it. The llSetText is how this is achieved.
So lets go ahead and add the floating text.
Step 1: Add a state_entry event to each of your default state.

Step 2: Add the following line of code inside the state_entry event.

Step 3: Save your script.
You will notice that the floating text your entered will appear above the prim your script is in.


Before we continue I want to explain what vectors are.

Vectors

Vectors are a group of 3 floats used as a single variable. They are seen as <x,y,z>. They can be used to set locations , velocity, and colours. In locations you have an x, y, z location. With velocity we have speed on x axis, speed on y axis and speed on z axis. In our script we have used the vector for a colour. This is set as an RGB colour code (Red, Blue, Green). You can get all the RGB colours you want from this a quick search on google. Just type RGB colour codes. With the vector x = Red, y = Blue and z = Green.

Alpha

So now we have a little understanding on vectors, the other thing I want to explain is alpha. In the SetText command we have an alpha parameter. The alpha parameter set how invisible the set is. 0.5 will make the text 50% see through. 0 will make is not show at all. 1 will make the text 100% visible play around with your text for a bit changing the colour and alpha.

Clearing Floating Text

If you don't want your text to appear anymore all you have to do is set the text to nothing.

The important thing to remember is this. If you add floating text to your prim, then decide you don't want that anymore, you can't simply remove the line of code that sets the text. This will keep the text there. The prim itself has a text variable and you are just setting it. So if you set the text and then remove this script, the text will remain. Before you remove the script you must first clear the floating text and run the script.

Continue Our Scripting

Ok now let continue with our script. Add a state_entry event to the inUse state. Now add some floating text to the inUse state_entry. Make this one say “Raiden Faxels Tip Jar\nAll Tips Greatly Appreciated\nTop Tipper Sigh Parx $L0”. Of course change the Raiden Faxel to the users name. Later we will change Sigh Parx to the actually highest tipper and the amount they tipped. The \n in the text makes a newline in the floating text. In order to change the name to the user we need to store that name when they log in. We will also store their key for later use. Add this at the top of your script.
Then in the touch_start event of the default state, set these variables with the following code.

Now we can use this variable in the state_entry of inUse to change the floating text to include the users name.
Your code should look like the following.

Accepting Payments

There's only one command you must add to accept payments into an object but there is an event you must add also to run code when someone makes a payment. Without either of these you can not accept payments. So lets look into that. To accept payments into your script you have to set the pay price of the prim. This is done with the following code.
The price integer is the default amount you want in the custom pay box. The list of quick_pay_buttons are the buttons people can press to pay that amount. Before we start this let me explain lists.

List

A list is a group is variables in one variable. You can have a list of all different types of variables except other lists. I like to see a list as an organised box of things you want to use later. For example I can have a list of avatar names. I would write this as follows.
 
Each name in my list has an index number. The first name in the list has 0. Then each index goes up by one. So Raiden Faxel has 0, Sigh Parx would be 1, Roxy Beliveau has 2 and Warfina Tisch has 3. We can use these numbers to get the information later by using the llList2String command.
 
So to get “Sigh Parx” for the list all we type in is this.

 Let's Add The Pay Option

Ok so we are ready to add the pay option.
Step 1: In the state_entry event of the inUse state create a list with four payment prices. I like 50, 100, 200, and 500 as a default.
 
Step 2: Now add in the SetPayPrice command. We'll put the price as 100 and use the quick_pay_button list we just created.
Step 3: Add the money event to the inUse state.
The money event simply gets the avatars key and the amount they donated. We'll look into this very soon.
Step 4: Save your script and test it. Log into your donation box, and then right click the object to select pay. You should see this dialog come up.
 
As you can see our quick pay buttons are on the side and our default amount is in the other amount textbox.
This script is the basics of a donation box. But we are going to go a little further and put the highest donator in the floating text, and we also need to make this pay the person logged in. At the moment it will pay the owner.

How it works

As the script starts the script starts in the default state and waits for someone to touch it. When they log in it moves to the inUse state when the llSetPayPrice command runs and sets the buttons for the donator. Having the money event in as well allows the object to then show the pay option. When an avatar pays an amount they are given a dialog to choose an amount. When they click pay. The amount is taken from them and given to the owner of the object.

GiveMoney

This script is what takes money from you and hands it to another avatar. But there are a few things you need to understand about this command before using it. First of all, there is no way to know if the money was actually sent or not. Lets say the script says to send $500L but the avatar only has $100L. There is no way to test to see if the full amount was paid. There is another command that gives all this information but for this script we are only sending the funds as someone makes a donation, so the money will always be there. Second, a give money command must be accompanied by a permission allowing for the the transfer of funds.
The give money command looks like this.
The destination script is the avatars key where the money will be sent. The amount is the amount of lindens that will be transferred.
Let's add this into our script.
Step 1: Add the permission line of code in the state_entry of the default state. This will ask the owner for the permission to send the donated money to the logged in user.

 
There are many other permissions to give but for now this is the only one we need. As you can see this gets the owners key and requests the PERMISSION_DEBIT permission. The avatar will be sent this permission dialog.
 
Step 2: Add the give money command to the money event we added in the inUse state. We can use the userKey for the destination. We can also use the amount variable in the money event.
Step 3: Save your script. You will be sent the permissions if you have your script in an object in the sim. Accept the permissions,. If you have a second avatar, try logging them on and log them into the donation box. The use you avatar to make a donation. This should pay your first avatar, then your first avatar will pay the avatar using the donation box.
If you use 1 avatar you will see, you have paid [username] [amount] twice. This is because you made the donation which goes to the object owner. Then the object sends that donation to the avatar logged into the donation box, which is also the owner in this case.

How It Works

When the script first starts the owner is asked to accept permissions to take lindens from them. This is required to send the money to the avatar using the donation box. When someone makes a donation the money is sent to the owner and then the script sends that amount from the owner to the person using the donation box.

Notes

There is a lot of worry out there about vampire bites that take your money or other scripts that do the same. This is not possible. For someone to take money from you you need to first accept the permission for the money to be taken from you. If you get a permission and you dont know why, deny it straight away. It is possible to place a give money command inside a product you buy and then drain you money. So if there is no reason for a scrip to to take your money, deny to permission. However if its something that must use money then you kinda need to take that risk. If you see your money draining just take the object out of the world and then money will stop being taken.
The second thing that must happen to take your money, is the object has to be owned by you. No one can make a script to take money from you in an object they own and without permissions. So relax a little with all these scares.

Final Additions

The last thing we need to do is show who made the highest donation to the avatar and a total amount of donations made. Lets just jump in and do it.
Step 1: Add three more global variables. Global variables are ones outside all of the script so we can use them through the whole script. These variables will be...
highestName will be used for the avatars name who donated the highest amount. HighestAmount will be used for the highest amount that avatar donated and totalDonated will be the total amount of lindens the logged in person have raised.
Step 2: In the money event we need to add the amount donated to the totalDonated.
What this says is, “Set the totalDonated to what totalDonated already equals plus the amount the avatar donated.
Step 3: Change the message the user gets when they log out to show the total donated.
 
Use write (string) before totalDonated because totalDonated is an integer not a string and we are trying to add it to a string. This tells the script to treat it as a string.
Step 4: Reset the total donated when they log out. Do this by setting totalDonated to 0 when the script enters the default state_entry event.

If statements

So now lets look at if statements. These run tests on informations to run different code. And if statement looks like this.
The condition is something that must equal true for the code inside the brackets to run. Lets take our code example. We need to see if the donated amount is higher than the current highest donated amount.
However we can not write it like this. The script will not understand.
If we place the if statement in the money event we can use the amount they donated against the highestAmount variable we made. That would look like this.
The code inside the curly brackets will only run if the if statement is true. We have a few things we can use to do tests.
<
Less Than
>
Greater Than
==
Is Equal To
!=
Is Not Equal to
You can also use a string in a if statement. For example if avatarName = “Raiden Faxel”
So lets add it all in.
Step 1: Add the if statement above in the money event.
Step 2: Inside the if statement set the highestAmount to equal the amount.
Step 3: Set the highestName. We do this by running a new command call llKey2Name. This command looks like this.

 
This command takes and avatars key and gives back the avatars name. We can use the id in the money event to get the donators key. Heres the code to set the highestName to the avatar who donated.
Step 4: Set the floating text to show the highest donator. This must be done in the if statement as we only want it to change if the amount is higher.
The final code inside your money event should be.

How It Works

When a user donates, the money event is run the amount donated is added to the total amount and then the money is sent to the avatar using the donation box. The amount is then tested to see if it is bigger than the current highest amount and if it is the amounts are changed and the floated text updated to show the highest donator.

One More Thing For You

At the moment if someone is logged in anyone can log them out just by touching the box. We need to stop this from happening by seeing if the avatar touching the box is the same avatar that has logged in. If not, tell the toucher the donation box is currently in use. The other thing to do is when the user logs out we need to reset the amounts in highest donator. I'll leave this to you to figure out. And show you the code next week.

Tuesday, 12 May 2015

Secondlife - Learn to Script: Chapter 3

Contents

Chapter 2: Let's Make A Key Finder
Chapter 3: Let's Make A Personal Microphone
Chapter 4: Let's Make A Donation Box

Chapter 3: Let's Make A Personal Microphone

Scope of Existence 

Before we start I want to explain the scope of existence. The scope of existence refers to where a variable is valid in comparison to where it was created. A variable is only valid inside the area it was created in. Let’s take a look at the following example.
V was created inside the script but outside everything and so can be used anywhere in the script.
W was created inside the default state. It can be used anywhere within the default state, but it cannot be used in the newState as this is outside its scope of existence.
X was created inside the touch start event of the default state. It can only be used inside this touch event. If newState had a touch start event also, X cannot be used inside that touch event.
Y was created inside the while loop. It can only be used inside this while loop. If you tried to use it elsewhere you would get an error.

Lets Get Started

We have now come to where we will be making our next product and learning the next command and event. The listen event and commands are useful in making our objects talk to each other or even make it so you can talk to your object. Let’s just jump into the deep end on this one and get scripting.
Step 1: Make a new object with a script inside. Call this one “Personal Microphone”. This object we are making is a wearable microphone. When turned on it will shout everything you say. Delete everything in the script to start with an empty script.
Step 2: In this script we are going to have two states. The first being default which is always needed. We are going to treat this as the off state. The second state we need is the on state. Write the two states to get your script started. Your script should look like this
Step 3: We need an event to change from default to on. Let’s set that up with a touch event. Write a touch start event inside each state.
Step 4: We need to tell the script to switch to the other state inside the touch event. If you remember how to do this go ahead and add it in. If not, just look below.
Step 5: Add a state_entry event for each state. The state_entry event runs when the state is entered. So switching to the on state will run the on state's state_entry command. This is written as followed.
Step 6: The last step in setting up this product before we discuss the listen commands is to add in the say command to tell what state the microphone is in.


This is as far as we are going to go for now. Before we continue I need a talk about the listen command and event.

Listen Command

The listen command tells the script to start listening on a set channel and also what things to listen to or listen for. A listen command is written in the following manner.
The parameters are the listen filters. Channel is of course the channel on which we want the script to listen on, ObjectName is the name of the object or avatar we want the script to listen to, TalkerID is the UUID of the avatar we want the script to listen to, and MessageSpoken is the message we want the script to listen for.
Any of these filters we can leave empty in a way to tell the script to listen to everything in that category. For example, if I want the script to listen to any object I would type empty quotes in that filter. If I want to listen for any message I would type empty quotes in that field. The only filter that needs a true input is the channel.
These three listen commands listen for different things. The first one will listen on channel 0 for anything said by any object or any avatar. The second will listen on channel to for an object called “Object” saying anything. The last line will listen on channel 5 for the owner of the object containing the script, saying “Hello”.
The llGetOwner() command will get the UUID or key of the owner that owns the object that the script is in. The NULL_KEY tells the script not to listen to any set key. Basically it makes the key reference empty.
In our microphone script we want to listen to anything the owner of the microphone is saying in global chat. Add this line into the script in the state entry event of the on state.
You code will look similar to this

You can have many listen commands all sent to the save script.
So now we have the script listening to the owner. It can hear everything the owner says. But it will not do anything when it hears it. We have not set up an event to tell the script what to do when it hears the owner. This leads into our next section.

Listen Event

The listen event is executed when the object hears something that fits the listen command filters you set. I listen event has the same parameters as the listen command and are set in the same order. This is how it is written.
All the listen commands will be sent to the same event. The parameters are stored in the variables created in the event eg: integer channel, string name…
Let’s add this into our script and test it out with some say commands in there.
Step 1: Place the listen command under the touch event
Step 2: Add 4 say commands inside the listen event (one for each variable).
Remember, the reason we placed (string) in front of some of these variables is because the say command can only say strings. The variables name and message are already string but we need to cast the integer and the key into strings.
Step 3: Save your script
Step 4: Touch your object to turn it on and then say something.

How it works

Our script starts in the default state. When we touch the object it switches to the on state. When it enters this state the script goes into the state entry event. Inside this event we have a say command telling the avatar the microphone is now turned on. We also have the listen command. This sets the script to listen on channel 0, to any name, to only the owners UUID or key and to listen to anything they say.
How the script is set to listen to anything. We then said something in the global chat. I personally said “Hi”. This starts our listen event, which has our 4 say commands inside it.
What you will notice is the object saying
The first say command is told to say the channel. We spoke in the global channel which is 0. As you can see the object has said 0. Next it was myself, or you in your case, that said something. Our next say command was to say name. In my case it said Raiden Faxel. The following say command was to say the id. The id is the UUID of the avatar or object saying it. My this case is it my UUID or yours in your case. And finally the last say command was to say the message. This is what we actually said. I said Hi. The script has repeated what I have said.
This should hopefully give you an understanding as to what the listen command and event does. There are only a few changes we need to do to finish this
Step 1: In the listen event we just created delete the first 3 say commands leaving only the one that says the message.
Step 2: Change this say command to a shout command.
Step 3: Let’s add some comments to help you understand what is going on.
 
Step 3: Save your script.
Now we just make your object useable. I personal set it to attach to my ear and make it look like a personal microphone. What you make yours look like is entirely up to you.
Congratulations you just made your second product.
The next section of this book we will be learning to do tests on information we are given and run different code from the different results. These are called if statements. For example: If the avatar touching the object is the owner, show them the menu, otherwise, tell them access denied.

With our second product made, I hope you are starting to learn how things work. Next week, we will work on another product a donation box. We will be learning how to receive and send money to and from avatars. 
Until Then Geek It Up

SighFye

Tuesday, 5 May 2015

Secondlife - Learn to Script: Chapter 2

Contents

Chapter 2: Let’s Make a Key Finder

States

The first thing in scripting is writing your states. Like I said earlier these can be seen like a light bulb. A light bulb has two states, On and Off. The default state being off and another state being on. A script can have many different states which you can name anything you want. A state name must not have spaces. The default state is called default. This one MUST be called default and must be in the script. A state is written like this

This snippet of code has two states in it, default and nextState. All states must have the keyword state in front of it to tell the script that it is a state. The only one that is allowed to break this rule is the default state. This is because default is also a keyword that the code recognises and knows it is the default state. Notice also how both have curly brackets { }. These brackets indicate the start and end of the state. The code you write into each state is placed in the middle of these brackets. When this code starts it will be in the default state. It will not enter the nextState until told to do so. This can be done using the code state nextState;. 

A demonstration on States

Step 1: Open the same script we created earlier, by opening the script editor in the object. To find it rezz out the object which had the script inside. Right click the object and choose Edit. This will then open the build window. Click content and double click the script.
Step 1: Delete all the code that is already in the script we have just created.
Step 2: Copy the following code into the script editor. Do not worry about what the code is doing and what it means just yet. This is just an example as to what states are. When copying the code, ensure you copy everything down.

Step 3: Click on save. You will notice once you have clicked save the object will turn green. If you click on the object it turns red. If you click it again the object will turn green again.

NOTE: This example will work, however if you are changing states its best to use touch_end. That way when you are finished touching the object, THEN and only then will it change it state. (Thank you Dave Pearson for bring this to my attention)

How it works

When the script is saved or reset it starts in the default state. Within this default state there are two events. One is for a touch event and the other a state entry event. The state entry event runs as the default state has been entered (state_entry). The code within that event has 1 command llSetColor. This command turns the object green. I will go further into this command later in the book so do not worry if you do not understand it. The second event is the touch_start event. This runs when someone starts to touch the object. The event has 1 line of code reading state red;. This tells the object to enter into the red state (state red).
The red state has the same code as the default state with the difference that it changes the object red not green. The other difference is when the object is touch it calls the state default command telling the object to enter the default state.
 

Events

Events are triggers within your script that run a certain piece of code. There are many different types of events from state_entry and touch_start which we saw earlier, listen and money events. In this book we will learn a few of the events you will need in order to make the products I am teaching you.
An event needs 3 main things. The first is the name. You cannot name these events as they are premade from Linden Labs. The name in the example I am giving are state_entry and touch_start. The second thing it needs is its parameters. These are placed inside the brackets of the event name. A parameter is information which the event is going to use. If we look at the touch_start event we see integer num_detected within the brackets. This is the events parameter. I will go into that a little later. The final thing an event needs is the start and end curly brackets that the state also used.
Let’s go further into some events and describe them a little more. We will also make some objects to demonstrate these events.
 

State Entry Event

The basics of the state_entry event are probably the most simple of all the events. This event does not call for any parameters. Even though no parameters are called for it still needs the brackets, we just leave them empty. The state entry runs the code when the script has entered the state in which this event is inside. In the last object we made we used the state entry event which changed the colour of the object.

Touch Events

There are three different touch events.
touch Runs code continuously while the user is touching the object.
touch_start() Runs code once for each time the avatar starts a click on the object (mouse down)
touch_end() Runs code once for each time the avatar finishes a click on the object (mouse up)

Let’s start by looking at the touch event by making a new object and writing a script.

touch

Step 1: Open up the build window by pressing ctrl and b together. This is an alternative way to open the window from the other way we learnt earlier.
Step 2: Choose a shape to use, any will do. You should notice your mouse cursor has turned into the wand again when it is not over the build window. Click somewhere on the ground near yourself. If your object does not appear ensure you have build rights on the land you are on. If your cursor is not a wand and instead you see a circle with a line through it, it means you do not have build rights. If you do have build rights it may be a Second Life issue or you may be experiencing lag.
Step 3: Name your new object touchEventExample.
Step 4: Click the Content Tab to view the object contents. You should not have anything in here just yet. Click on New Script to create a new script.
Step 5: Right click on the new script and choose Rename. Rename the script touchEventExample. Press Enter. Double click the script to open the script editor.
Step 6: Click inside the editor and press ctrl and A together. This selects all the text available. Now press delete. You should be left with an empty script.
Step 7: Let’s start our default state. Type the following…
 
Step 8: Place your cursor on the line between the two brackets and type the following code…
 
The reason the touch event is indented in is to make it easier to see where things start and end. In this example we can clearly see where the default state starts and ends and where the touch event starts and ends.
The next line we need to add is a say command. This is so we can see something happen when we touch the object.
Step 9: Type in the following code between the touch events curly brackets.
 
Do not worry at the moment how this works. We will go into the say commands a little later in the chapter.

How it works

When you click save the script resets and starts in the default state. Inside the default state it finds the touch event. This event is not activated until the user touches the object. When this happens the object says “Hello!” The object repeats itself while you hold the mouse button down because the touch event runs again and again while the mouse button is held.

There are two other touch events which we can learn the same way. Lucky for us we do not need to write it all again. Follow the next steps to create a duplicate of the last object.
Step 1: Right click on the object we created and select Edit. The build window will appear and the object will have three lines through it. Hover the mouse over one of the lines. You will notice that it lights up a bit more.
 
Step 2: While holding down the shift key on your keyboard, click and drag the object using the lines. When you let go of the mouse button you will notice another object has appeared in the place the old one was.


Step 3: Click on the new box. The build window will have the information of the new box. Let’s go ahead and change its name in the general options of the build window. Name this new one touchStartEventExample. Go to the Content window and rename the script to touchStartEventExample also. Right click and choose rename.
Now we have our second object. This object we are going to demonstrate the touch_start event.

touch_start

Step 1: Following straight after the last exercise, double click on the script to open up the script editor.
Step 2: Change the code from

 To
 
Step 3: Click on save and close all the open windows. Now touch the new object. Try to hold the mouse button down.

How it works

This script works very much the same as the last one except the touch_start event is only ran when the user first touches the object. It does not run any more times.

touch_end

Step 1: Copy this object to make a third object. Rename the object and the script touchEndEventExample. If you do not remember how to do this follow the exercise earlier.
Step 2: Change the touch_start or touch event to a touch_end event. Your script should look like the following
 
Step 3: Click save and touch the object. Try to hold the mouse down.

How it works

This script runs the same code as the last script but only executes the code when you lift your finger off the mouse button.
These examples show you the difference between the three touch events. These can be used in many different way and help you create some great scripts. We will be learning two more events within this book but not until a little later.

Commands

There are many commands within SL scripting. They can range from adding variables, saying something in the sim or detecting who has touched an object. In this next section you will be learning a few commands that will help you create your products. The commands are the things that make your object do what you want it to do. All commands must have a semicolon at the end of the line. This is because the script itself does not know where a line starts and ends. We as the scripters must tell the script when an end of line has occurred. A lot of times when a program has an error it may just be missing a semicolon at the end of a command line.

Say Commands

You have already seen the use of a say command. We will now go into the say command in more detail. There are four main say commands which differ in the range in which they can be heard. The smallest ranged command is the whisper command which can be heard within a 10m radius. The next is the most commonly used say command, Say. This one can range up to a 20m radius. Following after that is the shout command. This ranges up to a larger radius of 100m. And the last and loudest command is the RegionSay command. This one can be heard by all avatars on that region.
Command Written Range
Whisper llWhisper(channel, string) 10m
Say llSay(channel, string) 20m
Shout llShout(channel, string) 100m
Region Say llRegionSay(channel, string) Whole Region


These commands all need the same parameters in order to work. They need a channel to talk on and something to say which is in the form of a string. A string, if you have forgotten is a sequence of characters, for example ‘Raiden, ‘Raiden Faxel’ and ‘Hello my name is Raiden’. These examples are all strings. A channel can range from 0 to… well I haven’t found an end number yet. 0 is the channel that all avatars hear. Every other channel is not posted in global chat and so not heard by anyone. These channels are useful for objects to talk to each other. You can have one object say something on channel 12 and another object listening on channel 12. We will go into the listen events later. For the moment let’s stay with the say commands. We won’t go further into the say commands as we will be using them in everything we script. We can learn our lessons on the way.

Detected Commands

In this section we will learn some more commands. These commands are called detected commands and can help to identify things like who touched the object, what face of the object they touched or other information about things happening around the object.

DetectedKey and DetectedName

These are the only two detect commands we will be learning. They both are very useful when combining them with the touch events we wrote earlier. In these following steps we will make your first sellable product. It probably will not be able to be sold for much as there are many of them that are out there for free. The product is a key finder. It will find the UUID of an avatar and display it in global chat. The UUID is a unique code that every object, picture and avatar has in SL. In fact everything in SL has a UUID that is unique. So let’s start on this product.
Step 1: We need a new object. The object I want you to use in this case is the sphere. Press ctrl b to open the build window. Click on the wand and then click on the sphere. Click anywhere on the ground and watch your sphere come into the world.
Step 2: The build window should have gone to the Content tab. If it did not open click the content tab now. Once you have the tab open click on the New Script button. Rename this object and the script “Key Finder”.
Step 3: Open the script editor by double clicking the script. Delete everything that is already in the script. You should now have an empty script editor.
Step 4: Write a new default state.

Step 5: Add a state entry event inside the default state.

 
Remember we need to indent in each time we add a new group of code.
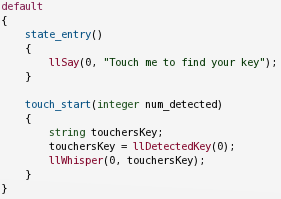
Step 6: We want the object to tell the avatar what to do when it is rezzed out. Add a say command inside the state entry event that will tell the avatar to touch the object to find their avatar key. Your code should look like this.
 
Step 7: Next we need to add a touch start event. Add this below the state entry event.

 
Step 8: Before we go ahead we are going to need a string variable to hold the users key in. To make a string variable we need to come up with a name for it. When naming your variables it is always best to choose something that makes sense. If you name your string x, you will not know what x is in larger scripts. However, if you name your string touchersKey then you will always know what it is. To make this string write the following code inside the touch start event.


Step 9: Right underneath the string write the following code

This line of code tells the script to place the detected key of avatar 0 into the string touchersKey. The number in the detected key command refers to the avatar touching it. If you were using the touch event (the one that repeats the code) and had multiple people touching the objects, you could change this number to refer to a different avatar. 0 is always the first avatar, then 1, then 2, 3,and so on.
Step 10: Now we need to say the key. Let’s make the object whisper the key to the avatar so that it does not bother many avatars. Like I said before a say command needs a channel and a string. In previous uses of the say command we wrote the string ourselves. This time we are just going to give the say command our string touchersKey. Write the following code under the last line you wrote.

 
Your code should now look like this

How it works

This script when it first starts enters the default state. Upon entering that state it runs the state entry event. Inside that event we have written a say command to tell the user what to do. When the avatar touches the object a string variable is created called touchersKey. The next line places detected key of the avatar that touched the object into our touchersKey variable. The last line then whispers our string. Our string holds our avatars key and so the object whispers the avatar key.

Before we declare this product as complete, let’s add some extra features to it. Imagine if ten people all touched the object at the same time. The object will be saying 10 different keys and no one will know which key belongs to whom. So let’s add in something that tells everyone which key belongs to whom. For this to work we are going to use the Detected Name command. This command works the same as the Detected Key command. We will also create another string to hold the name.
This time I will guild you through the steps but will not show you the code. I want you to come up with the code yourself. I will however show you the end result of the code.
Step 1: You need to create a new string variable to hold the avatars name. Let’s call this one touchersName. Place this one above where you created touchersKey.
Step 2: We need to put the avatars name into this new string. It is done exactly the same way as putting the avatars key into touchersKey however instead of using the Detected Key command we will be using Detected Name command.
Step 3: Finally we will need to say the avatars name just before we say the avatars key. Place another whisper command above the first one and get it to say the avatars name.
Step 4: Our code is getting a little bigger so let’s add in some comments. Above where we created the variables add a comment saying ‘Variables’. Above where we placed the information into the variables make a comment that says ‘Variable assigning’. Finally add the comment ‘Tell the user’ above where we use the whisper commands.
Let’s see how well you did. Your code should look like this.

If you got the code right, congratulations. If not do not worry we have a long way to go. I am sure you will pick it up sooner or later.
See how the detected name command is written exactly the same way as the detected key command. Save your script and touch the object. You will see this time the object is now saying one of the following depending on where you are looking at the chat.

Joining Strings

Strings are a very useful variable to use and there are many things you can do with them. In our last exercise we placed an avatars key in a string and their nam
e in another string. It would be a lot easier if we could store them in the same string. Well we can. This is done using a +. Let’s now go back to our key finder and add this in.
Step 1: Create a new string called message. Place the code in the Variable section of your code.
 
Step 2: In the Variable assigning section of the code we need to assign the combined strings into the message string. Change your Variable assigning section of your code to match the following.

You will notice I placed the new line of code below the other ones. This is because we want message to have the avatars name and key. If we do it before they are placed in the first strings our message will be empty. Once message is set it does not change when touchersName or touchersKey changes. We would need to reassign our message the new strings after they have changed.
Step 3: Change our Tell the user section of the code to the following

Step 4: Save the script touch the object. You will see the object now says the name and key on one line.
Raiden Faxele43a6285-1726-4d12-bd31-e194747fee4d
This is of course my name and key. You will receive yours.
This is however very confusing in a practical sense as we cannot see where the name ends and the key starts. It does however show you that using the command, we have joined the two string together and made them one string.
Let’s alter this a little so we can see the difference between the name and the key.
Step 5: Change the message assignment line to read the following.

Notice we have added + “: ” + into the script. This works because anything written inside quotes is seen as a string. In this line of code there are three strings.
  1. touchersKey
  2. touchersName
  3. “: “
The third string cannot be reused as it is not assigned to a variable but we can use it in this line of code. We are then simply adding all three string together.
Step 6: Save your script and touch the object again. This time you will see it say
Raiden Faxel: e43a6285-1726-4d12-bd31-e194747fee4d

This is much easier to read and if multiple people touch the box we can clearly see which key belongs to which avatar.
So we have written our first lsl script. We have learned how to use touch events and use that touch event to collect information on who touched the object. We have also learned how to talk to the avatar or at least tell the avatar the information we have collected.

Next week we will be going into how variables work, what they are and when they will work. Until then, Happy Scripting.

SighFye